Living Room Update Progress

Jan 30, 2018

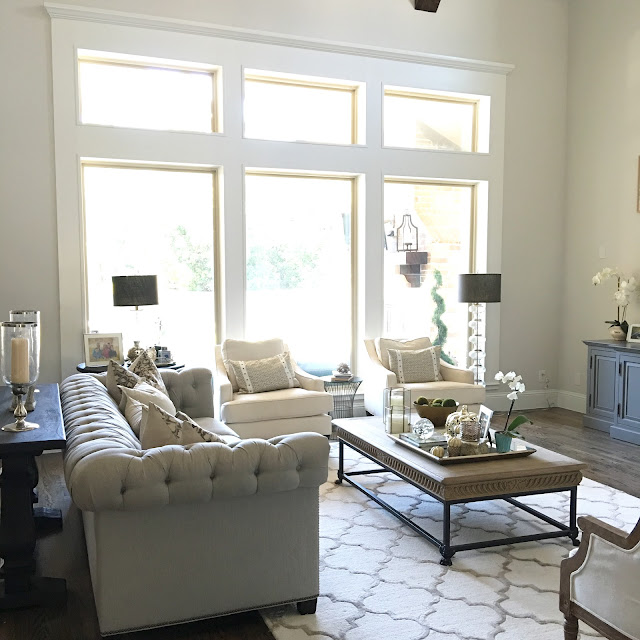
You're probably wondering what living room update? It was not on my to do list until last week. I've been working on my home office, but that is on hold as I wait for a wallpaper installer to call me back. I was told there is a shortage of installers. I suppose that makes sense because it went out of style in the 90s and has come back so quickly the past couple of years. I decided to turn my attention to a couple of home projects that need to be completed before summer as I wait. 

One of those projects is drapes for my living room windows. Our west facing living room gets flooded with bright light on summer afternoons. The drapes for my tall and wide windows will have to be custom made to function properly. The previous bamboo shades did not cover the top transoms, and it didn't quite go with the look of the room.


I could put them back up temporarily, but then it would cause holes that would need to be repaired in the new window trim. Besides the functionality, drapes on each end of the windows would help soften the wall. It just feels so bare since the Christmas tree came down. Those chairs need some color, too. Good grief, these January pictures are depressing!


Custom drapes will be expensive, and I do not want to have to replace them with future home decor changes. I had already been considering changing up my living room so I decided to go ahead with it before adding the drapes. It will be a small update of just adding a bit of blue to the already cream and gray color scheme. That means the high contrast black and white abstract has to be moved to another room to make way for a softer look. 


I didn't want to add too much blue because I want the option of adding different colors in the future. The gray will not be going anywhere. It's in my media center and my kitchen island. I'm happily stuck with gray! I've heard it is on it's way out, but I don't believe that for a second. I do think you may see it blended with other colors instead of just gray and white/cream. However, that is just my prediction. Or maybe it's because I am tiring of my ultra-neutral room? It needs some life! Actually, in real life it isn't quite this washed out. This is really just a result of using my iPhone to take pictures. These are probably the worst pictures I have, but it shows you what I'm talking about. I have to brighten up the photos, which tends to white out everything. Regardless, I'm ready for a softer and more colorful look. Maybe I'll start bringing out my Nikon when I photograph this room, too!

The first thing I did was remove the small pictures from above my TV and not put the black sofa table back after Christmas.


I have always been frustrated with this view of the TV. I'd love to have a very tall built-in media center with doors covering the TV, but that is way down the line in priority so I decided to add larger artwork with a bit more interest/color. My foyer art is perfect!


It has blue, gray and tan/caramel in it. It's also part of a series so I picked up it's companion and hung it above the TV. I haven't taken a picture yet because they are hanging by the previous nails and need to be moved. I'm also painting the silver frame a champagne gold color to go with the living room decor. The blue color is small enough that I can choose to bring out the blue or ignore it if I go in a different direction in the future. 

I love abstract art, but for the big wall I decided on something a bit more like a landscape so they weren't competing with each other. I also decided it should not have blue in it to keep it to a minimum in the decor I won't be changing for a while. I knew instantly the painting that would be perfect. That's the benefit of keeping on top of new items to the market. It makes decorating a room much easier!


I just love this abstract landscape! The best part is I didn't have to move the nails. It's exactly the same size as my old art. The leopard pillows are temporary. I just moved them from the media room until I buy new pillows. 

I added a bit of color albeit gray to the chairs in front of the window. Oh, you can see the art above the TV in this picture!


You might notice I'm also moving around the accessories on the fireplace, media center and tables. I only need a few things and I'm pretty sure they will be picked up at Homegoods for a low cost update. The art and drapes will be the only high cost in this room, but I did get the art 50% off (order via phone or in-store for the discount). I'm ordering custom pillows for the sofa, but thankfully they aren't that expensive on Etsy. I haven't quite decided if I'm going to keep the pillows on these chairs. It depends on the color combo I come up with for the sofa. I just love the direction it's going so far. The colors are still muted to keep a serene feel but contrast better for more interest. I love to add pops of color in the florals or a couple of accessories. I can't quite do a blush color in a pillow with four men in the house, but I can add pink florals without it looking to feminine.  

This week (and probably next week too) I will be deciding on pillows, painting the silver art frames and looking for accessories. I'm hoping the drapes will be decided on as soon as I get samples and quotes. I decided on a solid cream color and possibly a gray tape trim on the leading edges for a look that will last years. I'm hoping I can wrap up this project and the office in the next 4-6 weeks, but if it lasts longer that's fine too. As long as I get my drapes by summer I'll be happy!


SHOP THE POST


Home Office Update: Paint and Chandelier

Jan 16, 2018

We're having a snow day today! It's the second time this year, which is unheard of for Houston. My kids took the tops off the plastic Christmas bins and are using them for sledding down the hill in the backyard. It feels like 15 degrees so they are in and out of the house, which is driving me crazy! It looks like the temperature isn't going to be above freezing until tomorrow afternoon so I'm pretty sure there will be no school again tomorrow due to the ice on the roads. When it snowed in November we were all so excited because it had been so many years since we had seen snow. It was also the first time I have ever seen it stick to the ground in Houston. It looks like we're going to have a repeat of that weather today!


I mentioned a couple of posts back that I was planning to do an office update. I was considering a few options at the time of where to add the wainscoting and what color to paint it. The decision was made pretty quickly after I typed out that post. Sometimes I just need to organize my thoughts on paper (or on a computer screen) to work it all out in my head.

We started with plain white walls and a builder grade light. The furniture is old, but the rug is new. My husband and I started hanging the moldings first. I completely forgot to snap a pic. Here is an IG story pic I posted after we hung the chair rail and taped out the other areas the trim will go. I was trying to figure out how big to make the three boxes at the time.


The trim on the walls went up so fast! I didn't time it, but it only took a few hours. The next step was to pick the wall color and chandelier. I mocked up the lighting I was interested in using the pic collage app. It helped me visualize what it would look like once it was installed by taking a measurement of the middle box and fitting the light inside it so the scale would be correct. The paint was a bit difficult to nail down, but I finally settled on the far left color. It's Sherwin Williams Summit Gray. 


Here it is all complete! The chandelier is up and the walls are painted. I also painted the crown moulding and the baseboards the same color to give it an authentic paneled look. It took two full days, but it was so worth it. It feels dark and moody, but not too dark. It's just cozy and comfortable. I told my husband it's like a men's study/cigar smoking room. He won't be smoking in here of course! The next step is to pick the artwork for the middle box. 


You might notice the side walls only have wainscoting on the bottom third of the wall. It's like that all the way around the room. All of the crown moulding is painted gray. I just hadn't gotten to it yet in this picture. Only the back wall is completely painted gray. The top two-thirds of the walls will have a faux grasscloth in a sand color.


Here is a better pic of the chandelier from the website. I'll also link it at the bottom of this post. 


Once the artwork and wallpaper is in I'll give you a better tour of the room. That is all I'm going to do in this room for now. I'd like to eventually add new furniture, drapes and hardwired sconces on the back wall. Those things can wait a while as I move on to other projects. My goal was to do just enough to make it presentable. I think the before and after is already a huge improvement. 


Before


After(ish)


I typically remodel my rooms in phases. I start with a detailed plan and then decide what can be done to make it look nice and functional even if it's not completely finished. It's not ideal, but we have to address other home projects that are more important first. Even though we aren't looking to sell our home it's a good idea to take this approach because if we do sell we'll have completed the projects that buyers would expect to be done. I have an entire list of things that include touch-up paint, refinishing the marble counters in the kitchen, and installing a balcony railing on the back porch. The latter is at the top of my priority list since it's a safety issue. However, if I happen to come across a great deal on office furniture I might just change my mind!


SHOP THIS POST


Kitchen Refresh

Jan 6, 2018

I think almost everyone can agree that our homes feel so bare when the Christmas decor gets put away. There are a few things in most rooms I'm ready to tweak a little this month. Even though I'm in the middle of remodeling our home office, I stopped and picked up a few things for my kitchen. Luckily, I knew exactly what I wanted and it was easy to make a couple of stops to pick up a few things one afternoon in between looking at paint and wallpaper. My husband's Christmas gift to me was a new coffee machine so naturally I needed a new coffee bar. I tried to put one together with everything I had on hand, but I really needed just a few more things so I wasn't running all over the kitchen to make my coffee in the morning. I am not a morning person!


My husband bought me a Jura that grinds whole beans and makes my espresso, coffee or cappuccino at the touch of a button. I needed a small cup to froth my milk, a place to hide my sweet n'low, a sugar bowl for the people not on a diet (I know nothing about that!) and a place for my stirring spoons.


The Jura really is the star of the show. I can't even begin to tell you how amazing this coffee tastes. I've made lattes, coffee, espresso and cappuccinos. The cappuccinos are definitely my favorite. I'm also hoping using 2% milk and a Sweet n' Low will be better than the 280 calories worth of creamer (I measure and die a little) I normally put in my coffee every morning. I realized the reason I was putting so much creamer in my coffee is because the coffee was subpar in my traditional drip coffee to say the least. Keurig was even worse! I can almost drink it black out of this machine. It wasn't me! It was the coffee! Next time you visit Sur La Table or Williams Sonoma try this coffee. They usually give free samples. I know it's expensive, but if you are a coffee connoisseur like me you will have an epiphany...or as Oprah says an aha moment. If you like the coffee buy it at Bed, Bath and Beyond. You can use your 20% off coupon!


I found the two tiered tray on clearance at Homegoods for $18! I can't believe it, but it wasn't even damaged. The coffee gods were smiling down on me that day. It's a very feminine look that I could easily change up if one of the four males in my house complains one day. I decided since it was hidden in a corner of the kitchen it wouldn't be such a big deal. Unsurprisingly, no one even noticed there was a change.

The blue and white pieces are from my china set. The sugar bowl and creamer cup that holds the gold spoons are from Anthropologie. The gold spoons were also a Homegoods find.


I didn't change too much in the rest of the kitchen, but I added fresh flowers and that made a world of difference.


I also added a marble and gold cutting board very similar to the two tiered coffee tray behind the stove. I felt there was a bit too much wood there.


My obligatory shot of Mario. He was not moving from the sofa when I was taking pictures. This is us having a stare down.


New Year, New Project: Home Office Inspiration

Jan 1, 2018

Happy New Year! I hope everyone enjoyed the holidays. My favorite part of the holidays aren't the big celebrations, but the quiet evenings by the Christmas tree and fire. It's one of the reasons I still haven't taken down my tree yet. I just love when it lights up at 5 o'clock every evening. My husband said I should just buy a big ficus tree and put lights on it to enjoy all year. I really lol'd at that one! 

The bright side of the holidays being over is that I can focus on the projects I've been putting off the past couple of months, namely the home office. I started planning out the design this summer, but kept changing my mind. I have to admit it was all due to not wanting to spend a lot of money on a room that isn't regularly used or seen by visitors. My first thought was to hire someone to build built-in bookshelves. That's what all legit home offices need, right? 

My biggest inspiration came from a model home in my own neighborhood. When I saw this study I wanted to copy every detail (minus the furniture). The dark gray paneled walls, the bookcases and the sconces were exactly what I had in mind. I would have added filing drawers to the bottom of the bookshelves to be more functional. When I started dissecting the details on the actual cost that's when I realized the millwork was going to be very expensive. My husband and I can DIY the wainscoting, but not the bookshelves. That's when I decided to skip the non-functional shelves and just work on the wainscoting.


Huntington Custom Homes


I've found several examples of beautiful wainscoting. It has made my decision a bit harder. I could go with paneled walls all around the room. We would just paint the walls the same color as the trim so it would be faux. I thought about using wood floor to ceiling, but the cost of materials would be too expensive. I really don't want to redo the baseboards and the crown either.


Another option would be to wallpaper the room in grasscloth and use trim. It would avoid the faux wood look of the walls. The cost of the wallpaper and having to hire someone to hang it made me hesitate on this option. It also seems less like an study and more of a bedroom look. I decided to scrap this one, but I still want to show you the picture because it's so pretty. I may end up with his look in another room!


A third option is to partially panel the room. I could have wainscoting to the ceiling on the main wall behind the desk and then only on the bottom half on the other three walls. The top could be painted and maybe eventually wallpapered by myself. I think I might be able to handle small sections. I just love the shine of grasscloth, but I would also get the paneled study look with this option. I'm leaning towards this idea.


We decided to start hanging the moldings today! I just need to have my coffee and breakfast taco first. We're going with the last option, but we can always go back and add trim to the top of the last three walls if we decide that would look better. 

The next decision is the color of the trim, which will either be white or gray to go with the rest of the house. If we go with white wainscoting the other three walls with be painted gray or have gray wallpaper. If we go with gray wainscoting the walls will be a sand color like in the above photo. The first step is to get the moldings up. If everything goes correctly I'll post progress photos on my Instagram stories!


Merry Christmas!

Dec 25, 2017


Jennifer, Jason, Dylan, Ryan and Aidan


....and Mario