Why I Didn't Choose a Loveseat

Apr 26, 2013

My second armchair is finally here!


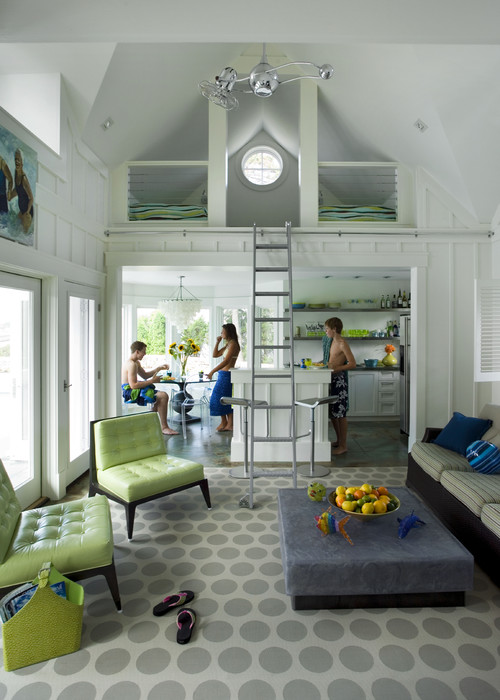
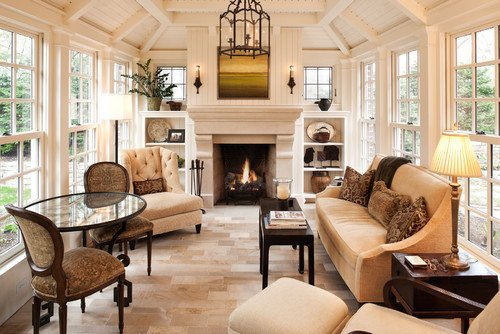
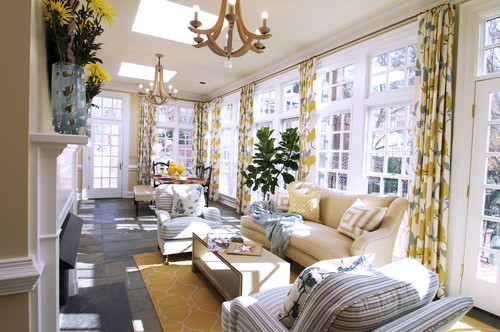
I didn't realize not getting a loveseat was going to be such a topic of conversation with friends and family. Buying new sofas does seem to be an ingrained process. You go to the furniture store and buy a matching sofa and loveseat, maybe a side chair or recliner too. I rocked the boat and opted not to buy a loveseat for several reasons.

The first, is that I didn't like looking at the back of my loveseat from the kitchen and breakfast room. Most people can put a sofa table behind the loveseat to solve this problem, but it didn't look right since I have that weird half wall thing going on. A sofa table next to the half wall just looked weird. The side benefit of having chairs is that I have a better view into the living room. Before, it felt completely blocked off by the loveseat. In this small space, that wasn't a good thing.


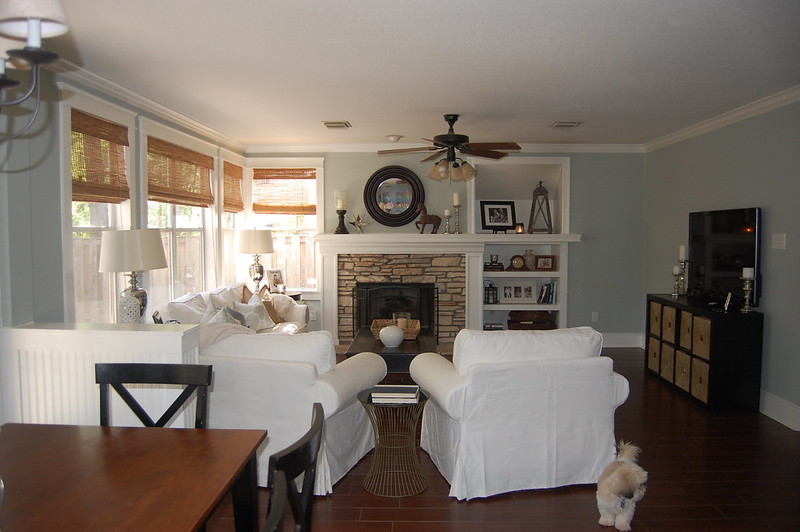
A second reason, is that I can eventually move these chairs around. I'm still considering moving them to face the sofa, which is my favorite combination. Moving the tv over the fireplace would be necessary with this layout, but installing the tv turned there turned out to be a lot more complicated than I first thought. We're going to stick to this arrangement for now.

I mentioned it before, but I really don't like sharing a loveseat with someone. I prefer to have my own chair and I'm sure my guests feel the same way. Don't you always feel like you're going to accidentally kick or elbow the person next to you?

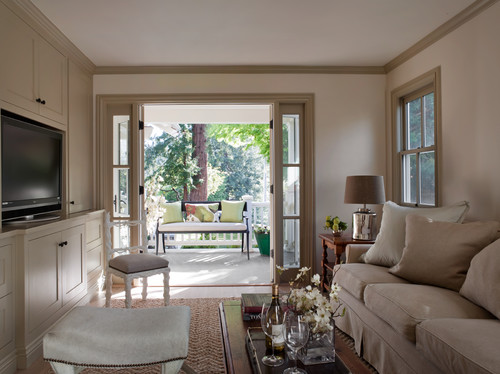
Since you last saw this room. I moved my sea green Windsor Riad pillow back in and rearranged the mantel a bit. I finally found a spot between the chairs for my little side table I bought on sale at Target. I thought it was so cute and picked it up months ago even though I had no place to put it.


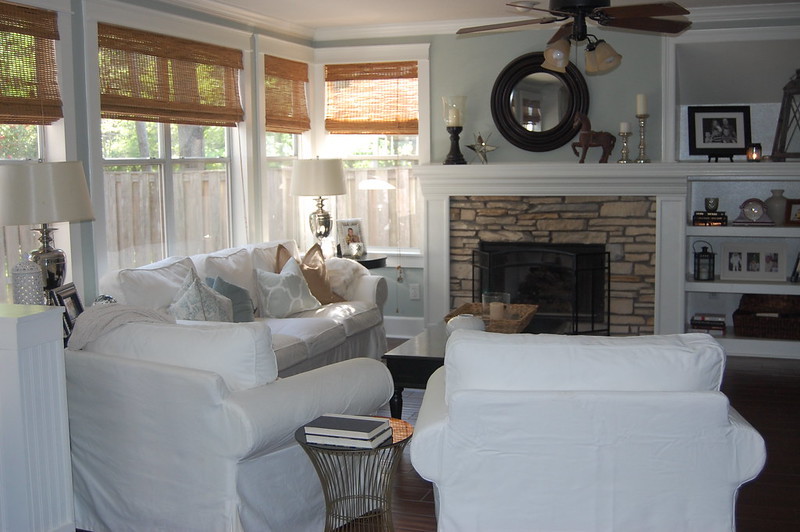
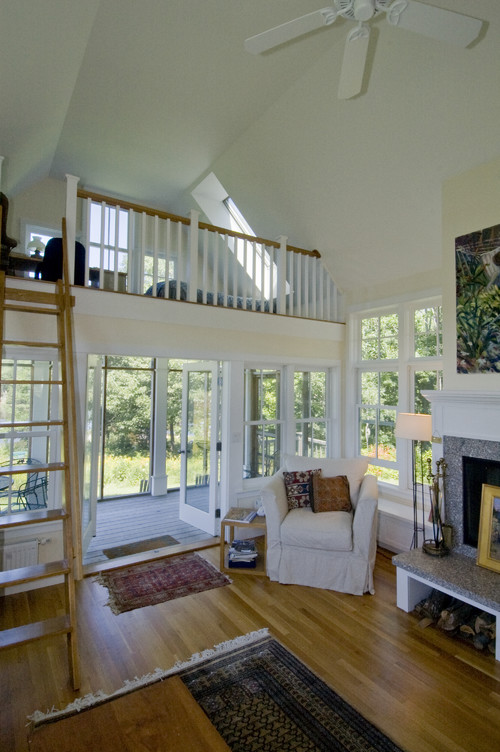
Is the ceiling fan driving you crazy? I curse it every single day. My husband and I have a disagreement about it. He thinks we will die this summer without a fan in here. I think we'll be fine without it. I'm going to wait a few months and see how necessary it really is before making a change. I'm sure I'll be right!


Bigger Isn't Always Better

Mar 25, 2013

I'm reminded of how easy and relaxing it can be to live in a small space every time we go on vacation. Before we left on vacation I was trying to decide whether to continue to remodel our home or to move to something larger. I realized after spending a week in a two bedroom condo that I definitely do not want a bigger home. I loved being a few steps from every room and every item I needed. There are so many times I hear my phone ring in the office, but let it go to voicemail because I know there's no way I can make it down the stairs and to the front of the house without breaking my neck. If I moved at all it would be to something smaller and without stairs! It would also be nice to concentrate on making each room extra special with more attention to detail. I do love my home and neighborhood so we've decided to stay put (again) and continue to make our home, our home.

Here are some beautiful smaller homes with details usually reserved for estate homes. Just imagine what we could be living in if we put our money into amazing details instead of square footage.


I absolutely adore the first image of the English stone cottage and the French style home with the gravel driveway. I would feel like I was on vacation every single day if I lived there. Which is your favorite?


Friday Favorites

Mar 22, 2013

Here are a few things I've had on my mind this week...


Yoga_girl on Instagram


I'm the type of girl more likely to laugh through yoga class, but I love yoga girl's poses. They look extremely difficult, but I'm determined to try some of the easier ones. If that doesn't work out, I'll just live vicariously through her images.


On the subject of yoga, I'm living in this tank top from Lululemon lately.

Power Y TankPower Y Tank

It's a great tank by itself or as a layering piece. I'm wearing it under cardigans, jackets, long sleeved tops, etc. The best part is you don't need a bra. Just make sure you ask for the free bra inserts.


Ballard Designs Indoor/Outdoor Rugs

Belgrado Ikat Indoor/Outdoor Rug

I just ordered this one for my front entryway. It's a great design and great price. The 5'3 x 7'7 is only $99.

I've seen this one in quite a few bloggers' homes, too. This might be perfect for my stairs.

Chevron Stripe Indoor/Outdoor Rug


Speaking of stairs, I'm finally getting around to painting them. It's going slow because of work, housework (especially after vacation), and an out of town husband. I'm so excited to be off this weekend so I can make some progress. I just hope no one accidentally steps on them while they're drying!


Cool Wallpaper

Jan 22, 2013

I stumbled upon Urban Outfitters "apartment" section while looking for the source of a rug I saw on Pinterest. They have some very cool things! One of my favorites is their wallpaper, but this isn't your Grandma's wallpaper.


Zee Wallpaper


Marrakesh Honey Wallpaper


Peony Wallpaper


Damsel Wallpaper- Fuchsia


Tree Shadow Wallpaper


Cute, right? The best part is it's easy to remove and reapply elsewhere. I love that!

They also have wall murals.

Lulie Wallace Flowers For Phoebe Wall Mural

How cute would this look in a tween/teen girl's room?


Sophie Headboard Wall Decal

Love this faux headboard!


Birch Tree Wall Mural

Rustic and Modern

I didn't expect such a good find in an unlikely place. I have all sorts of ideas running around my head now of where I could use a bit of wallpaper-closet, kids rooms, accent walls, etc.

Also, I'm finally on Twitter and Instagram now. You can find me on Twitter @cstylehome and on Instagram as classicstylehome.


DIY Project: How to Recover a Tufted Headboard

Jan 13, 2013

I still can't believe that not only did I manage to recover my headboard, but that it looks good! It looks really, really good! If you remember, I'm in the process of completely redoing my master bedroom. I decided to go with a completely different look than the rest of my house. It's white with touches of black, a little contemporary, but still elegant. As much as I adored my tan silk tufted headboard, it just did not go in the new room. I decided to try and recover it instead of buying a new one in white. I figured if it didn't work I wouldn't be out much money. Here it is before.


Yes, I still have snowflakes on my dining table. I decided to decorate for winter this year. Doesn't everyone do that? Just kidding. I forgot about them and the Christmas decorations are already up in the attic. They might be there a while.

I went to a local fabric store and scored three yards of fabric for a total of $13.50! It's Christopher Lowell fabric in a white microsuede. I like it because it won't show the tan fabric or the batting through it. I wasn't quite sure how I was going to recover it when I bought the fabric.

My first step was to see what was under the black backing. I was hoping to see knots where the buttons were tied so I could take the fabric off and start new.


But, that would just be too easy. I would have to take the entire headboard apart to get to where the buttons are tied.

I considered forgetting the tufting and wrapping the fabric around the headboard, but it just looked loose because it couldn't get tight enough due to the tufting under it. So, I sat there and stared at it for a good twenty minutes. Eventually, I came up with a plan. I decided to cut little slits in the fabric and wrap them around each button. I tested it out on an end piece and it worked!


I began by laying out my fabric with an even amount hanging off the sides of the headboard. I should have allowed for more fabric on the end because I took a little fabric from the end as I tufted. Thankfully, I had enough fabric by the time I was finished tufting to wrap it around the side of the headboard. I secured the end that I initially started on with staples. Then, I pulled the fabric tight and made a little tiny notch in the fabric with an exacto knife over the button I was working on. I made the slit a little larger with scissors and increased the size as needed to slip around the button.


Done tufting! My fingers are still sore a day later. I barely had enough fabic to staple the end around the side, but thankfully I did.


Here's a closer look after I made pleats with the excess fabric between each tuft.


I was thinking I would also wrap the existing buttons with the fabric, but that did not work at all. I found button covers at the fabric store and used the kit to wrap the fabric around each button. Did I mention there are 29 buttons? It's easy, but tedious. I just popped them on top of the old ones when I was done covering them and they actually stay in place. I'm going to put a little glue on the edges to really secure them. That way the buttons will only be glued to the new fabric. It will be easier to take them off and the old buttons won't be damaged.


Here it is finished!


I'll have a room shot with the headboard soon. Right now, I've got paint samples on the wall and all sorts of tools spread around the room. It ain't pretty!

I still can't believe I did this. It really was easy and if my non-crafty self can do this, anyone can!